“The ProGuard tool shrinks, optimizes, and obfuscates your code by removing unused code and renaming classes, fields, and methods with semantically obscure names. The result is a smaller sized.apk file that is more difficult to reverse engineer…. Having ProGuard run is completely optional, but highly recommended.”
But this documentation for ProGuard is minimal in its recommendations, and ProGuard advice on Stack Overflow is inconsistent. Some developers find that ProGuard can introduce bugs when delivering push notifications, making in-app purchases, and using third-party libraries. This post is a conservative guide to ProGuard that minimizes the chance of these bugs by stressing safety over aggressive optimizations. When developing Burner for Android, this approach still led to ProGuard reducing the size of its.apk file by almost 25%, from ~1.7 MB to ~1.3 MB.
Basic configuration
First, open your project’s project.properties file and find the line specifying proguard.config. Append to it a colon as a delimiter, followed by proguard-appname.txt, substituting your own application name for appname. In its entirety the line should look like:
If no such line for proguard.config exists in your project.properties file, add one.
If you navigate to the directory {sdk.dir}/tools/proguard/, you’ll find that in addition to proguard-android.txt there is another file named proguard-android-optimize.txt. By using the former, your code will be shrunk and obfuscated. By using the latter, your code will also be optimized. But as Donald Knuth famously said, premature optimization is the root of all evil. The preamble to proguard-android-optimize.txt warns us so:
“Adding optimization introduces certain risks, since for example not all optimizations performed by ProGuard works on all versions of Dalvik. The following flags turn off various optimizations known to have issues, but the list may not be complete or up to date.”
We’re erring on the side of safety and referring to proguard-android.txt instead of proguard-android-optimize.txt. If your application is running slowly, it may be best to explore other space-time tradeoffs in your code before switching to proguard-android-optimize.txt. If using proguard-android-optimize.txtintroduces a bug on an esoteric or new version of Dalvik, that bug may be impossible or costly to fix.
Next, create that file proguard-appname.txt in your project. It should be a sibling of the project.properties file. Again, for Burner, this filename is proguard-burner.txt.
From the collective wisdom of Stack Overflow, I always begin this file with the following entries:
-keep public class * extends android.app.Activity
-keep public class * extends android.app.Application
-keep public class * extends android.app.Service
-keep public class * extends android.content.BroadcastReceiver
-keep public class * extends android.content.ContentProvider
-keep public class * extends android.preference.Preference
-keep public class com.android.vending.billing.IInAppBillingService
-keep public class * extends android.view.View {
    public (android.content.Context);
    public (android.content.Context, android.util.AttributeSet);
    public (android.content.Context, android.util.AttributeSet, int);
}
-keepclasseswithmembers class * {
    public (android.content.Context, android.util.AttributeSet);
}
-keepclasseswithmembers class * {
    public (android.content.Context, android.util.AttributeSet, int);
}
-keepclassmembers class * extends android.content.Context {
    public void *(android.view.View);
    public void *(android.view.MenuItem);
}
This excludes shrinking and obfuscating parts of classes that extend select classes from the Android API. The line including BroadcastReceiver is especially important if your application reacts to notifications, while the line including IInAppBillingService is especially important if your application offers in-app purchases. Again, some of these exclusionary rules could probably be removed, but we’re erring on the side of safety.
Third-party libraries
Many problems with ProGuard stem from the inclusion of third-party libraries in your project. For example, the following line of code from the greenDAO ORM throws a NoSuchFieldException because ProGuard obfuscates the field name TABLENAME:
The first step in avoiding such errors is to consult the documentation of each third-party library and follow any instructions for deployment with ProGuard. For example, the Urban Airship documentation instructs adding the following lines to your configuration:
# Suppress warnings if you are NOT using IAP:

-dontwarn com.urbanairship.iap.**
# Required if you are using Autopilot
-keep public class * extends com.urbanairship.Autopilot
# Required if you ARE using IAP:
#-keep class com.android.vending.billing.**
# Required if you are using the airshipconfig.properties file
-keepclasseswithmembers public class * extends com.urbanairship.Options {
public *;
}
If the documentation mentions nothing about ProGuard, but the library is open source, then there is no point to obfuscating its code from a security standpoint anyway. Find the source code for the library, or temporarily rename the JAR file so that it has a .zip extension and extract its contents. Then find the ancestor packages for its code. For example, the ancestor package for all greenDAO ORM code is de.greenrobot.dao, which includes subpackages async, identityscope, internal, query, and test. With the following two lines in our ProGuard configuration, we exclude shrinking and obfuscating any code in package de.greenrobot.dao or a subpackage like de.greenrobot.dao.async:
In addition to the JAR file for greenDAO ORM, your libs folder may contain JAR files for third-party libraries like Joda Time and the Android Asynchronous Http Client. Your project may also depend on Android library projects like ActionBarSherlock and ViewPagerIndicator. Applying the approach above to each of these libraries, proguard-android.txt looks like:
-libraryjars libs

# The official support library.
-keep class android.support.v4.app.** { *; }
-keep interface android.support.v4.app.** { *; }

# Library JARs.
-keep class de.greenrobot.dao.** { *; }
-keep interface de.greenrobot.dao.** { *; }
-keep class org.joda.** { *; }
-keep interface org.joda.** { *; }
-keep class com.loopj.android.http.** { *; }
-keep interface com.loopj.android.http.** { *; }

# Library projects.
-keep class com.actionbarsherlock.** { *; }
-keep interface com.actionbarsherlock.** { *; }
-keep class com.viewpagerindicator.** { *; }
-keep interface com.viewpagerindicator.** { *; }
This immediately follows the block of entries shown under Basic configuration. Change its content according to what libraries your project depends on.
Output
ProGuard runs when you build your application in release mode. After it has run, you should find a proguard directory in your project directory. The Android’s documentation for ProGuard contains complete information on the files it contains, but two are especially important:
seeds.txt contains classes and members excluded from obfuscation. Here you should find those belonging to the library packages that you explicitly excluded; if missing, then they were obfuscated and bugs may appear.
mapping.txt maps between the original and obfuscated class, method, and field names. If you are using a crash-reporting tool like Crittercism to automatically collect the stacktraces from crashes, then you will need this file to translate their obfuscated names back to their original names. Many crash-reporting tools will automatically perform this translation given this file; for example, see the Crittercism documentation. Because mapping.txt is so important to debugging, commit it to Git, add it to Dropbox, or copy it to a location that grants it longevity.
Further optimization:-
While this is a conservative guide to ProGuard, you can use it as a starting point for aggressive optimization with fewer exclusionary rules. Refer to its official documentation for more information.
How hating code made me a better designer.
Product Design through a technical looking glass
Four months ago, I left my cushy San Francisco gig at LinkedIn to learn to code.
As an aspiring designer, I didn’t have a clue about how web products were built. Coding was the next logical step to pursuing this goal.
I started my intensive coding bootcamp not knowing the difference between programming logic and markup, and I most certainly couldn’t tell you the difference between client side and server side code (or even what those terms meant).
Needless to say, the learning curve was painful.
Source: Akoallana
Now, as I interview for Product Design roles, I realize that learning to code was undoubtedly the right decision for me. As I tackle design challenges, I consistently recognize my “coding hat” in full motion as I dissect problems. Here are a few key lessons that have come out of my experience:
Keep things simple
Coding is about writing clean, legible and functional programs that can execute a series of micro-tasks. Overall, the problems you’re trying to solve are big.
In the past, upon starting a design project, I felt overwhelmed by the ambiguity of what I was designing. Coding taught me to break up every problem into small micro-bites that are executable as individual functions.
Now, as I approach a design problem, I start by looking at the collective whole with the confidence that the pieces can be chipped away, bit by bit.
Pro-tip: As you wireframe, think of each element as a component. I’ve started to design from the perspective of a developer by thinking about each component as the building blocks of my application.
Responsive website redesign concept for Kiva. My partner and I broke down the design through developers eye, as we were making design decisions.
Learning how to learn
In the past, when tasked with a problem I was unsure the answer, or asked to use a technology I had yet to touch, I would immediately go into panic mode.
Coding taught me that a human brain can’t possibly store all the information one needs to write in dozens of languages or on multiple operating systems. Programming teaches you the fundamentals of how to think. And for everything else, there’s Google.
Want to program in iOS? Learn PHP? Or design a chatbot? Chances are someone has written about their experience or published their solution to a component of code, or design element you can reference. Break down the pieces of what needs to be done and start your research from there.
Heightened empathy
If you aren’t coming from a computer science or technical field of study like engineering or mathematics, learning a baseline amount of code can bridge so many gaps. It can heighten your understanding of what’s important so you can think from the perspective of a developer as you design your product.
“The most important thing is for designers to develop empathy for how engineers work, and vice versa, so both sides can understand the other’s process and work together efficiently.” — Ryan Scott, Senior Designer, DoorDash
Designing for the technology you are using
Rarely will you wonder: is this possible? Learning the properties of various languages and web frameworks will help you understand the possibilities and limitations within your scope.
Even if you’re still unsure about whether an interaction is achievable, your coding sensibilities will help you figure it out. The first time I saw advanced CSS and JavaScript, a wave of inspiration hit me as I discovered an entire library of interactions at my disposal.
“Understanding engineering constraints allows me to look for effective design solutions.” — Elliot Dahl, Product Designer, Pivotal Labs
Pro-tip: Do your homework. Every language has official documentation. Between that, Stack Overflow, and Google searches, you should be able to find what’s in the realm of possibilities before you present your designs to the development team.
Better communication
Learning to code sequentially teaches you to think like an engineer. Thinking like an engineer builds bridges to form solid communication.
Coding gives you the ability to form a more holistic user experience and articulate your ideas in a way that a technically driven mind will respect.
Countless hackathons and teams later, I’ve learned that a creative is only as a good as their ability to get others to share their vision through the effective articulation of their ideas. Coding has helped me step into this space.
Coding can be infuriating. Until you get over the hump. Then it’s empowering.
I don’t hate coding anymore. I really enjoy it. But the scars from countless battles involving hair-pulling, head-banging frustration have marked me so profoundly that I will forever have the strongest empathy for developers working alongside me.
Through this experience I’ve learned that I don’t have to be a developer to think like one. If you can specialize in kick-ass designs, but have the communication skills to work with your technical partners, you can take your designs to the next level and become a great digital product designer.
With all the hype around designing and developing Android apps for the next billion, it’s easy to get overwhelmed by the why, what and how of it. I will try to explain things by keeping it simple.
Why should I care?
What makes an app great is responsive user-experience. Users don’t care if the network is bad. They just see your app “freezing up” and they uninstall.
When you are on blazing fast LTE networks, everything seems fluid and there’s hardly any issue. But the next billion people are on low bandwidth data connections. The real challenge is to build great experience for these users.
Next Billion’s network connection
What should I do?
“Design your app to work offline, and it’ll work beautifully all the time.” – Joanna Smith
We want to build apps that work seamlessly on spotty networks. Say goodbye to the ugly error message when the user is offline.
How do I do that?
We’ve got a bunch of great tools at our disposal thanks to the Open Source community. So:
1. Determine connectivity
Use Facebook’s Network Connection class to listen to the traffic in the app and categorise the quality of the network. If you use OkHttp, add an interceptor to start sampling.
If you don’t use OkHttp, definitely check it out 🙂
2. Cache effectively
Know your enemy. The network is spotty and it’s your enemy. The disk is reliable and it’s your friend. Fetching data over the network is both slow and expensive. As a result, the ability to cache and reuse previously fetched resources is a critical aspect of optimizing for performance.
Each network resource can define its caching policy via the Cache-Control HTTP header.
Cache-Control directives control who can cache the response, under which conditions, and for how long.
The server uses the ETag HTTP header to communicate a validation token.
The validation token enables efficient resource update checks: no data is transferred if the resource has not changed.
3. Act locally, sync globally
Make the Model persistent. When there’s new data from the server, update your persistent Model and let your Presenter know to check with the Model and update the View. Use events/callbacks for communication.
“the View should always reflect what is in the persistent Model” — Yigit Boyar
Similarly when you want to post data to the server, update the persistent Model and let the View update itself, maybe to a transient state. Don’t show a progress dialog and wait for the server response to update the view. If the device is offline, retry whenever the device get’s back online. You never want your app to look like it forgot something or it’s stuck. Use something like Evernote’s AndroidJob to simplify job scheduling.
Finally, when the server responds, update the persistent Model and refresh the View as before. This way you can act locally, but sync globally.
4. Effective threading
Offload work to threads but avoid creating too many or too little threads. It’s important to have a separate queue for local tasks vs network tasks. You don’t want the network queue to get hung up and become a bottleneck for the local tasks.
Use RxJava and let the smart guys handle thread scheduling for you 😉
5. Optimize images
Use RGB_565 color profile, each pixel is stored on 2 bytes and only the RGB channels are encoded. Determine network type to control image quality. Re-fetch a higher quality image when the network is fast.
Slower network == more compression
6. Use the Big Cookie model
Understand the Android radio state machine. A fully active wireless radio consumes significant power, so it transitions between different energy states in order to conserve power when not in use. While the low and idle states drain significantly less battery, they also introduce significant latency every time you create a new network connection, as the radio transitions to the full power state.
A typical 3G wireless radio state machine, 2G is obviously worse.
With that in mind it’s important to bundle your data transfers in your network queue. Done correctly, you can ensure that the radio draws power for as short a duration as possible. You should batch your transfers by queuing delay tolerant transfers, and preempting scheduled updates and prefetches, so that they are all executed when time-sensitive transfers are required.
The underlying philosophy of this approach is to transfer as much data as possible(bigcookie) during each transfer session in an effort to reduce creating small and frequent network connections(smallcookies).
This article is a step-by-step introduction to MVP on Android, from a simplest possible example to best practices. The article also introduces a new library that makes MVP on Android extremely simple.
Is it simple? How can I benefit of using it?
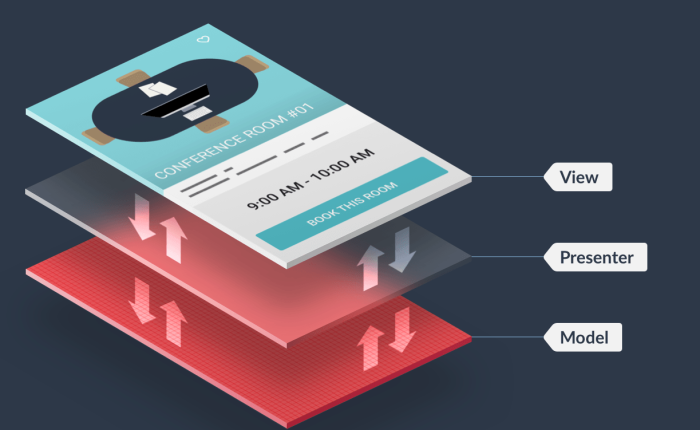
What is MVP
View is a layer that displays data and reacts to user actions. On Android, this could be an Activity, a Fragment, an android.view.View or a Dialog.
Model is a data access layer such as database API or remote server API.
Presenter is a layer that provides View with data from Model. Presenter also handles background tasks.
On Android MVP is a way to separate background tasks from activities/views/fragments to make them independent of most lifecycle-related events. This way an application becomes simpler, overall application reliability increases up to 10 times, application code becomes shorter, code maintainability becomes better and developer’s life becomes happier.
Most of the modern Android applications just use View-Model architecture.
Programmers are involved into fight with View complexities instead of solving business tasks.
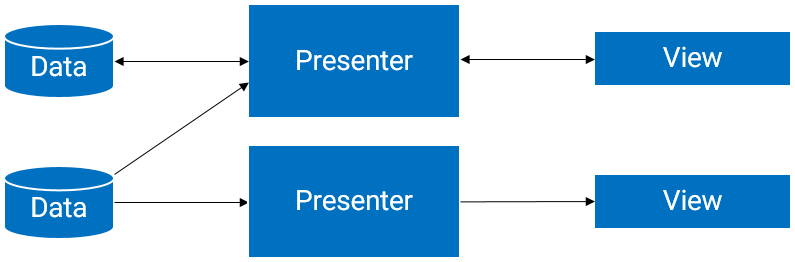
Using only Model-View in your application you usually end up with “everything is connected with everything”.
If this diagram does not look complex, then think about each View can disappear and appear at random time. Do not forget about saving/restoring of Views. Attach a couple of background tasks to that temporary Views, and the cake is ready!
An alternative to the “everything is connected with everything” is a god object.
A god object is overcomplicated; its parts cannot be reused, tested or easily debugged and refactored.
With MVP
Complex tasks are split into simpler tasks and are easier to solve.
Smaller objects, less bugs, easier to debug.
Testable.
View layer with MVP becomes so simple, so it does not even need to have callbacks when requesting for data. View logic becomes very linear.
Reason 2: Background tasks
Whenever you write an Activity, a Fragment or a custom View, you can put all methods that are connected with background tasks to a different external or static class. This way your background tasks will not be connected with an Activity, will not leak memory and will not depend on Activity’s recreation. We call such object “Presenter”.
There are few different approaches to handle background tasks, a properly implemented MVP library is one of the most reliable.
Why this works
Here is a little diagram that shows what happens with different application parts during a configuration change or during an out-of-memory event. Every Android developer should know this data, however this data is surprisingly hard to find.
                                          |    Case 1     |   Case 2     |    Case 3
                                          |A configuration| An activity  |  A process
                                          |   change      |   restart    |   restart
 ---------------------------------------- | ------------- | ------------ | ------------
 Dialog                                   |     reset     |    reset     |    reset
 Activity, View, Fragment                 | save/restore  | save/restore | save/restore
 Fragment with setRetainInstance(true)    |   no change   | save/restore | save/restore
 Static variables and threads             |   no change   |   no change  |    reset
Case 1: A configuration change normally happens when a user flips the screen, changes language settings, attaches an external monitor, etc. More on this event you can read here: configChanges.
Case 2: An Activity restart happens when a user has set “Don’t keep activities” checkbox in Developer’s settings and another activity becomes topmost.
Case 3: A process restart happens if there is not enough memory and the application is in the background.
Conclusion
Now you can see, a Fragment with setRetainInstance(true) does not help here – we need to save/restore such fragment’s state anyway. So we can simply throw away retained fragments to limit the number of problems.
                                          |A configuration|
                                          |   change,     |
                                          | An activity   |  A process
                                          |   restart     |   restart
 ---------------------------------------- | ------------- | -------------
 Activity, View, Fragment, DialogFragment | save/restore  | save/restore
 Static variables and threads             |   no change   |    reset
Now it looks much better. We only need to write two pieces of code to completely restore an application in any possible case:
save/restore for Activity, View, Fragment, DialogFragment;
restart background requests in case of a process restart.
The first part can done by usual means of Android API. The second part is a job for Presenter. Presenter just remembers which requests it should execute, and if a process restarts during execution, Presenter will execute them again.
A simple example
This example will load and display some items from remote server. If an error occurs a little toast will be shown.
I recommend RxJava usage to build presenters because this library allows to control data flows easily.
An experienced developer will notice that this simple example has some critical defects in it:
A request starts every time a user flips the screen – an app makes more requests than needed and the user observes an empty screen for a moment after each screen flip.
If a user flips the screen often this will cause memory leaks – every callback keeps a reference to MainActivity and will keep it in memory while a request is running. It is absolutely possible to get an application crash because of out-of-memory error or a significant application slowdown.
Please, do not try this at home! 🙂 This example is for demonstration purposes only. In the real life you’re not going to use a static variable to hold your presenter.
Technically speaking, MainPresenter has three “streams” of events: onNext, onError, onTakeView. They join in publish() method and onNext or onError values become published to a MainActivity instance that has been supplied with onTakeView.
MainActivity creates MainPresenter and keeps it outside of reach of onCreate/onDestroy cycle. MainActivity uses a static variable to reference MainPresenter, so every time a process restarts due to out-of-memory event, MainActivity should check if the presenter is still here and create it if needed.
Yes, this looks a little bit bloated with checks and uses a static variable, but later I will show how to make this look much better. 🙂
The main idea is:
The example application does not start a request every time a user flips the screen.
If a process has been restarted the example loads data again.
MainPresenter does not keep a reference to a MainActivity instance while MainActivity is destroyed, so there is no memory leak on a screen flip, and there is no need to unsubscribe the request.
It supports save/restore Presenter’s state in a View/Fragment/Activity’s state Bundle. A Presenter can save request arguments into that bundles to restart them later.
It provides a facility to direct request results and errors right into a view with just one line of code, so you don’t have to write all that != null checks.
It allows you to have more than one instance of a view that requires a presenter. You can’t do this if you’re instantiating a presenter with Dagger (a traditional way).
It provides a shortcut for binding a presenter to a view with just one line.
It provides base View classes: NucleusView, NucleusFragment, NucleusSupportFragment, NucleusActivity. You can also copy/paste code from one of them to make any class you use to utilize presenters of Nucleus.
It can automatically restart requests after a process restart and automatically unsubscribe RxJava subscriptions donDesturing roy.
And finally, it is plain simple, so any developer can understand it. (I recommend to spend some time diving into RxJava though.) There are just about 180 lines of code to drive Presenter and 230 lines of code for RxJava support.
Note: since the moment of writing this article, a new version of Nucleus was released. You can find updated examples in the Nucleus project repository.
As you can see, this example is significantly shorter and cleaner than the previous one. Nucleus creates/destroys/saves presenter, attaches/detaches a View to it and sends request results right into an attached view automatically.
MainPresenter’s code is shorter because deliit uses verLatestCache()operation that delays all data and errors that has been emitted by a data source until a view becomes available. It also caches data in memory so it can be reused on configuration change.
MainActivity’s code is shorter because presenter’s creation is managed by NucleusActivity. All you need to bind a presenter is to write @RequiresPresenter(MainPresenter.class) annotation.
Warning! An annotation! In Android world, if you use annotations, it is a good practice to check that this will not degrade performance. The benchmark I’ve madeGalaxy S on (year 2010 device) says that processing this annotation takes less that 0.3 ms. This happens only during instantiation of a view, so the annotation is considered to be free.
More examples
An extended example with request arguments persistence is here: Nucleus Example.
iver() will just delay all onNext, onError and onComplete emissions until a View becomes available. Use it for cases when you’re doing a one-time request, like logging in to a web service.
deliverLatest() will drop the older onNext value if a new onNext value is available. If you have an updatable source of data this will allow you to not accumulate data that is not necessary.
deliverLatestCache() is the same as deliverLatest() but in addition it will keep the latest result in memory and will re-deliver it when another instance of a view becomes available (i.e. on configuration change). If you don’t want to organize save/restore of a request result in your view (in case if a result is big or it can not be easily saved into Bundle) this method will allow you to make user experience better.
Presenter’s lifecycle
Presenter’s lifecycle is significantly shorter that a lifecycle of other Android components.
void onCreate(Bundle savedState) – is called on every presenter’s creation.
void onDestroy() – is called when user a View becomes destroyed not because of configuration change.
void onSave(Bundle state) – is called during View’s onSaveInstanceState to persist Presenter’s state as well.
void onTakeView(ViewType view) – is called during Activity’s or Fragment’s onResume(), or during android.view.View#onAttachedToWindow().
void onDropView() – is called during Activity’s onDestroy() or Fragment’s onDestroyView(), or during android.view.View#onDetachedFromWindow().
View recycling and view stack
Normally your views (i.e. fragments and custom views) are attached and detached randomly during user interactions. This could be a good idea to not destroy a presenter every time a view is detached. You can detach and attach views any time and presenters will outlive all this actions, continuing background work.
Best practices
Save your request arguments inside Presenter
The rule is simple: the presenter’s main purpose is to manage requests. So View should not handle or restart requests itself. From a View’s perspective, background tasks are something that never disappear and will always return a result or an error without any callbacks.
I recommend using awesome Icepick library. It reduces code size and simplifies application logic without using runtime annotations – everything happens during compilation. This library is a good partner for ButterKnife.
If you have more than a couple of request arguments this library naturally saves life. You can create BasePresenter and put Icepick into that class once and all subclasses will automatically get the ability to save their fields that are annotated with @State and you will never need to implement onSave again. This also works for saving Activity’s, Fragment’s or View’s state.
Execute instant queries on the main thread in onTakeView
Sometimes you have a short data query, such as reading a small amount of data from a database. While you can easily create a restartable request with Nucleus, you don’t have to use this powerful tool everywhere. If you’re initiating a background request during a fragment’s creation, a user will see a blank screen for a moment, even if the query will take just a couple of milliseconds. So, to make code shorter and users happier, use the main thread.
Do not try to make your Presenter control your View
This does not work well – the application logic becomes too complex because it goes in an unnatural way.
The natural way is to make a flow of control to go from a user, through view, presenter and model to data. In the end a user will use the application and the user is a source of control for the application. So control should go from a user rather than from a some internal application structure.
When control goes from View to Presenter and then from Presenter to Model it is just a direct flow, it is easy to write code like this. You get an easy user -> view -> presenter -> model -> data sequence. But when control goes like this: user -> view -> presenter -> view -> presenter -> model -> data, it is just violates KISS principle. Don’t play ping-pong between your view and presenter.
Following are the simplest tips I can give you to easily — and forever — improve the quality of your writing.
Delete the word “that.”
At least 90% of the times you use the word “that” can be removed from your writing and it will instantly make your sentence stronger.
Example: “You believe that I’m lying, but I’m not.” becomes “You believe I’m lying, but I’m not.”
Delete the words “I think.”
It adds nothing. Remove it to strengthen your point.
Example: “I think this is a good sentence.” becomes “This is a good sentence.”
Avoid words that end in “-ing.”
In most cases, the “-ing” softens your word and adds no value. Your writing will read better if you avoid it.
Example: “The experiences we’re seeking end up being underwhelming and even disappointing.” becomes “The experiences we seek often underwhelm and disappoint.”
Short sentences. Short paragraphs.
Most sentences can be cut in half. Don’t be afraid to have a two or three word sentence.
Keep paragraphs to less than three sentences.
White space is your reader’s friend.
Shrink your opening sentence.
Make it compelling, but keep it short and conversational.
Example: “This is a post that’s going to help you become a better writer.” becomes “I can help you.”
It all starts when some android developer tries to figure out a solution to a problem he/she is having while building their “Awesome Android App”. During the process, most developers would encounter a couple of issues and in tandem, to those, they would come up with possible solutions.
Now here is a thing, if you are like me, who believes that if the problem was big enough for me to spend some time on it and there wasn’t an existing solution out there, I would abstract the whole solution in a modular manner, which eventually turns out to be an android library. Just so that whenever in future I encounter this problem again, I can reuse this solution easily.
So far, so good. So you have built the library and probably started using it completely privately or if you think someone else could make use of the same solution you release the code as an android library i.e.you open source the code. I believe (..or rather that is what it looks like..) at this point everyone thinks they are done.
WRONG! This very point is where most people usually miss out that this android library code is going to be used by other developers that do not sit next to you and that to them this is just some android library they wish to use to solve a similar problem. The better your approach of designing the API the better the chances of making sure that the library will be used as it is intended to be and whoever is using it isn’t confused. It should be clear from the very start what needs to be done to start using the library.
Why does this happen? The devs that write these android libraries are usually the ones who don’t care about the API design when building one. At least the majority of them don’t. Not because they are indifferent but I think most of them are just beginners and there is no set rules that they can look up to be better at designing the API. I was in the same boat sometime back, so I can understand the frustration of not having a lot of information in this field.
So I have had my experiences and I happen to release some of the code as android libraries (which you can check out here). I have come up with a quick list of points which each and every developer who designs an API in the form of Android Library should keep in mind (some of them may apply to designing API in general too).
Point to note here, my list isn’t exhaustive and I may not be covering everything. It covers things I have encountered and wished I knew it when I started and thus I will keep on updating this post as and when I learn with more experience in the future.
Before we dive into anything let’s first answer the most basic questions that everyone would have regarding building Android SDK/Library. So here goes
Why would you create an android SDK/Library?
Sure it is…
Well, you do not have to create an SDK/library in all cases. It makes more sense to decide on building one based on the understanding of what value you bring to the table. Ask yourself the below
Is there some existing solution that would solve the problem?
If your answer is Yes, then possible try and use that existing solution.
Say that does not solve your specific problem, even in that scenario it is better to start by forking the code, modifying it to solve the problem and then using it versus starting from scratch.
Bonus Points to you if you go ahead and submit a Pull Request to get the fix you made pushed into the existing library code so that the community can benefit from it.
If your answer is No, then go ahead and build the android sdk/library. Share it with the world later on so that others can make use of it in their projects.
What are the packaging options for your artifacts?
Even before you start building your library you need to decide on how do you want to deliver your artifacts to developers.
Let me start here by describing some terms which we might use in the post here. To begin with let me describe what is an artifact first,
In general software terms, an “artifact” is something produced by the software development process, whether it be software related documentation or an executable file.
In Maven terminology, the artifact is the resulting output of the maven build, generally a jar , war , aar or other executable files.
Let’s look at the options you have
Library Project: Code that you have to checkout and link into your project. It is the most flexible one as you can modify the code once you have it in your code, but also introduces issues such as being in sync with upstream changes.
JAR: Java ARchive is a package file format typically used to aggregate many Java class files and associated metadata into one file for distribution.
AAR:Android ARchive is similar to JAR with added functionality. Unlike JAR files, AAR files can contain Android resources and a manifest file, which allows you to bundle in shared resources like layouts and drawable in addition to Java classes and methods.
We have the artifact, Now what? Where does one host these artifacts?
Not really…
Turns out you have a couple of options here too, each having its own pros and cons. Let’s take a look at each
Local AAR
If you happen to be very specific about not wanting to put your android library artifact into any repository, you can generate your local aar file and use that directly. Read this stackoverflow answer to understand how to do that.
In a gist is you need to put the aar file in the libs directory (create it if needed), then, add the following code in your build.gradle :
..what comes with this is that now whenever you want to share your android library you are passing around your aar file(…which is not the best way to share your android library).
Avoid doing this as much as you can, since it is prone to a lot of problems the biggest one being manageability and maintainability of the code base.
Another issue with this approach is you cannot make sure that the users of this artifact are in sync with the latest code.
Not to mention the whole process is lengthy and prone to human error, just to integrate the library in an android project.
Local/Remote Maven Repositories
What if you wanted to use the android library privately? The solution for that is to deploy your own instance of artifactory (read about how to do that here) or using Github or Bitbucket repository as your own maven repository (read about how to do that here).
Again this is specific to you using your android library privately.If you want to share this with others its not the approach you wanna stick to.
First issue that this approach has is that your artifact is in an private repository, to give access to this library you have to give access to the private repository which could be a security issue.
Second issue is that to use your android library one would need to include an extra line in their rootbuild.gradle file
..which to be fair is an extra step and we are all here to make the process simpler. It is easier on the creator part to push the android library out quickly but adds an extra step for the users to use the library code.
Maven Central, Jcenter or JitPack
Now the easiest way to push it out immediately is via JitPack. So you would want to do that. JitPack takes your code from a public git repository, checks out the latest release code, builds it to generate the artifacts and later publishes to their self hosted maven repository.
However the issue at hand is same as the one for local/remote maven repositories that users of your android library would need to include an extra line in their rootbuild.gradle file
You can read about how to publish your android library to JitPack here.
The other option you have is of Maven Central or Jcenter.
Personally I would suggest you to stick to Jcenter as it well documented and better managed. It is also the default repository that is looked up for dependencies in Android projects (…unless someone changed it).
If you publish to Jcenter, bintray the company behind it gives you the option to sync with Maven Central from within their publishing platform. Once published its as simple as adding the below line to your build.gradle file to use the library in any android project
You can read about how to publish your android library to Jcenter here.
With all those basic questions out of the way, let us look at things one should take care of while building an Android SDK/Library
Avoid multiple arguments
Every android library has to be usually initialized with some arguments and to do that you would usually be passing a set of arguments to either a constructor or have an init function to setup your library. Whenever doing that consider the below
Passing more than 2–3 arguments to your init() function is bound to cause more headaches than provide ease of use. Just because its hard to remember the exact mapping of these arguments and the order in which they are declared in the library code.It also is prone to more mistakes as anyone can make a mistake of passing int value in a String field or vice versa.
// DONOT DO THIS
void init(String apikey, int refresh, long interval, String type);
// DO this
void init(ApiSecret apisecret);
where ApiSecret is an Entity Class, declared as below
public class ApiSecret{
    String apikey;
    int refresh;
    long interval;
    String type;
// constructor
    /* you can define proper checks(such as type safety) and
     * conditions to validate data before it gets set
     */

    // setter and getters
}
Or you can also use Builder Pattern as an alternative approach to the above.
You can read more about Builder Pattern here. JOSE LUIS ORDIALES talks in depth about how to implement it in your code, take a look here.
Ease of use
When building your android library, keep in mind the usability of the library and the methods you expose. It should be
Intuitive
For everything thats happening in the android library code , there should be some feedback either in the logs or in the view. Depends on what kind of an android library is being built. If it does something that cannot be comprehended easily, the android library basically “does not work” in the language of devs. It should do what the user of android library expects it to do without having to look up the documentation.
Consistent
The code for the android library should be well thought and should not change drastically between versions. Follow semantic versioning.
Easy to use, Hard to misuse
It should be easily understandable in terms of implementation and its usage in the first sight itself. The exposed public methods should have enough validation checks to make sure people cannot misuse its functionality other than what it was coded and intended for.Provide sane defaults and handle scenarios when dependencies are not present.
In short…
simple.
Minimize Permissions
In the current times, when everyone just wants to jump the road and ask as many permissions, you should pause and think about do you really need that extra permission. Take care of these points especially
Minimize your permissions as much as you can.
Use Intents to let dedicated apps do the work for you and return the processed result.
Enable and disable your features based off if you have the permission for it. Do not let your code crash just because you do not have the said permission. If at all , you must educate the user well before requesting the permission and that why its required. If possible have a fallback functionality if the permission isn’t approved.
This is how you check if you have a said permission granted or not:
public boolean hasPermission(Context context, String permission) {
  int result = context.checkCallingOrSelfPermission(permission);
  return result == PackageManager.PERMISSION_GRANTED;
}
Some of the devs would say that they really need that specific permission, what to do in that case. Well, your library code should be generic for all types of apps that need the specific functionality. If you can provide hooks such as functions to let users of your android library pass the data you need the dangerous permission for. In that way, you do not force the devs to require a permission they do not want to. In absence of the permission provide a fallback implementation. Simple.
/* Requiring GET_ACCOUNTS permission (as a requisite to use the
 * library) is avoided here by providing a function which lets the
 * devs to get it on their own and feed it to a function in the
 * library.
 */
We have all been there. We have a specific functionality that requires that the device has a certain feature. The usual way you would approach this is by defining the below in your manifest file
..the problem with this is that when this is defined in the android library code, this would get merged into the app manifest file during the manifest-merger phase of build and thus hide the app in Play Store for devices that do not have the bluetooth unit (this is something the Play Store does as filtering). So basically an app that was earlier visible to a larger audience would now be visible to a smaller audience, just cause you added that to your library code.
Well, that’s not we want, do we? Nope. So how do we solve this. Well what you need to do is not include that uses-feature in your manifest file for the android library but rather check for the feature during runtime in your code as below
.. this way there is no entry in the manifest and once it merges into the app, it won’t let the app get filtered in the Play Store. As an added feature though if the feature is not available you can just disable the functionality in your library code and have some fallback functionality in place. It is a Win- Win for both the android dev who built the library and the dev who integrates the lib in their app.
Support different versions
How many are out there exactly?
If you have
a feature that’s available in a certain version of android, you should do the check for that in code and disable the feature if the version is lower than supported.
As a rule of thumb support the full spectrum of versions via defining in minSdkVersion and targetSdkVersion. What you should do internally to your library code is check for the android version at runtime and enable/disable the feature or use a fallback.
// Method to check if the Android Version on device is greater than or equal to Marshmallow.
public boolean isMarshmallow(){
    return Build.VERSION.SDK_INT>= Build.VERSION_CODES.M;
}
Do not log in production
Just DO NOT.
Almost every time I am asked to test an app or an android library project the first thing that I have seen is that they log everything up in the open, in their release code.
As a rule of thumb, never log in production. You should use build-variantswith timber to help you in the process to separate logging info in production vs debug builds. A simple solution can be to provide a debuggable flag that the devs can flip to enable/disable logging from your android library
// In code
boolean debuggable = false;
MyAwesomeLibrary.init(apisecret,debuggable);
// In build.gradle
   debuggable = true
Do not crash silently and fail fast
I have seen this a lot of times now. Some of the devs would not log their errors and exception in logcat! Which basically adds a headache to the users of the android library when they are trying to debug the code. In tandem to the last tip about not logging in production, you must understand that exceptions and errors need to be logged irrespective of being in debug or production. If you do not want to log in production, at least provide a functionality of enabling logs via passing some flag when you initialize your library
. i.e
void
 init(ApiSecret apisecret,boolean debugga
ble){      ...
      try{
        ...
      }catch(Exception ex){
        if(debuggable){
          // This is printed only when debuggable is true
          ex.printStackTrace();
        }

  }      ....
}
It is important that your android library fails immediately and shows an exception to the user of your android library instead of being hung up on doing something. Avoid writing code which would block the Main Thread.
Degrade gracefully in an event of error
What I mean by this is that when say your android library code fails, try to have a check so that the code would not crash the app instead only the functionality provided by your library code is disabled.
Catch specific exceptions
Continuing with the last tip, you might notice that in my last code snippet I am using a try-catch statement. Catch statement specificallyEx catches all ception as its a base class. There is no specific distinction between one exception vs the other one. So what one must do is define specific types of Exception as per the requirement at hand. i.e NUllPointerException, SocketTimeoutException, IOException, etc.
Handle poor network conditions
…this gets on my nerves, seriously!
If the android library you wrote deals with making network calls, a very simple thing that usually goes unnoticed is that you should always consider a case of what happens if the network is slow or non-responsive.
What I have observed is that library code developers assume that the network calls being made will always go through. A good example will be if your android library fetches some config file from the server to initialize itself. Now when developing the library the devs assume that the config file will always get downloaded. What they forget is that on a flaky network, the library code will not be able to download the config file and hence would crash the whole codebase. If simple checks and a strategy to handle such situations are built right into the android library code, it saves quite a number of people the headaches they would have otherwise.
Reluctance to include large libraries as dependencies
This one goes without much explanation. As most of fellow Android Devs would be knowing, there is a method count limit of 65K methods for android app code. Now say if you have a transitive dependency on a large library, you would introduce two undesirable effects to the android app your library is being included
You will considerably increase the method count of the android app, even though your own library codebase has a low method count footprint since you would transitively download the larger library and thus it will contribute to the method count too.
If the method count hits the 65K limit, just because of your library code that transitively downloaded the larger library, the app developer will be forced to get into the lands of multi-dexing. Trust me on this, no one wants to get into the multi-dexing world.
In such a scenario, your library has introduced a bigger problem than solving the initial problem. So most probably your library will be replaced by some other library that does not add to the method count or basically that takes care everything in a better way.
Do not require dependencies unless you very much have to
Now this rule is something that I think everyone knows, right? Do not bloat your android libraries with dependencies you do not need. But the point to note here is that even if you need dependencies you do not have to make the users of the library download it transitively. i.e the dependency does not not need to be bundled with your android library.
Well, then the question arises as to how do we use it if it is not bundled with our library?
Well the simple answer is you ask your users to provide that dependency to you during compile time. What this means is that not every user might need the functionality which requires the dependency. And for those users, if you cannot find the dependency as provided to you, you just disable the functionality in your code. But for those who need it, they will provide you the dependency, by including it in their build.gradle .
Next, you can use provided(Gradle v2.12 and below) or compileOnly(Gradle v2.12+)(Read here for complete information), so as to be able to get hold of the classes defined by the dependency during compile time.
dependencies {
   // for gradle version 2.12 and below
   provided 'com.squareup.okhttp3:okhttp:3.6.0'
   // or for gradle version 2.12+
   compileOnly 'com.squareup.okhttp3:okhttp:3.6.0'
}
A word of caution here, you can only use this functionality of requiring a dependency if its a complete java dependency. i.e if its an android library you want to include at compile time, you can not reference its transitive libs as well as resources which need to be present before compilation. A pure java dependency, on the other hand, has only java classes and they are the only ones that would be added to classpath during the compilation process.
Try not to hog the startup
no kidding…
What
I mean by this is that, as soon as the app starts up try not to initialize your android library greedily. What that would tend to do is that it will increase the startup time for the App itself, even though the app does simply nothing at startup except off course initialize your android library.
The solution to such a problem is to do all work of initializing off the main thread i.e in a new thread, async. Better if you use Executors.newSingleThreadExecutor() and keep the number of thread to just one.
Another solution would be to initialize components of your android library on demand i.e Load them up/initialize them only when they are needed.
Remove functionality and features gracefully
Do not remove your public functions between versions as that would lead the builds of many users of your android library break and they would be clueless as to why did that even happen.
Solution: Deprecate the functions by marking them @Deprecated and then define a roadmap of their removal in future versions.
Make your code Testable
Making sure you have tests in your code isn’t actually a rule to follow. You should be doing this everywhere and for every project app or library without saying.
Test your library code by making use of Mocks, avoiding final classes, not having static methods, etc.
Writing code with interfaces around your public API also makes your android library capable of swapping implementations easily and in turn makes the code more testable.i.e you can provide mock implementations easily when testing.
Document Everything!
Being the creator of the android library you would know about your code, but the people who are going to use it won’t know about it unless you expect them to figure out by reading your source code (you should never need that).
Document your library well including every detail about how to use it and detailing every feature you have implemented.
Create a Readme.md file and place it at the root of your repository.
Have javadoc comments in your code, covering all public functions. They should cover and explain
– Purpose of the public method
– The arguments passed
– Return type
Bundle a sample app which demonstrates a working example of how the library and its features are used.
Make sure you keep a detailed change log for your changes. A good place to do that would be to add the information right in your release section for the specific version tag.
Screenshot of Github Releases section for Sensey android library
This goes without saying. Always provide the most minimalistic Sample app with your library code, as that is the first thing other devs will checkout to understand a working example of using your android library. The simpler it is the easier it is to understand. Making the sample app look fancy and code complex would only undermine the actual goal of the sample app, that is to provide a working example of using your android library.
Consider putting up a License
Most of the time developers forget about the Licensing piece. This is one factor that decides the adoption of your android library.
Say you decided to license your android library in a restrictive manner i.e Using GPL license, would mean that whoever uses your library and makes modification will have to contribute back to your codebase in order to keep using the android library. Putting such restrictions hampers the adoption of android libraries and developers tend to avoid such codebases.
The solution to this is that you stick to more open licenses such as MIT or Apache 2.
Read about licensing at this simple site and about need of copyright in your code here
Last but not the least, get feedback
Yeah, you heard that right!
Your android library was built to cater to your needs initially. Once you put it out for others to use, you will come to know a lot of issues in it. Hear out your fellow devs and gather feedback. Act on it considering and weighing on the functionality to introduce or fix while maintaining the goals of the android library intact.
Summary
In short, you need to take care of the below points while building
Avoid multiple arguments
Ease of use
Minimize permissions
Minimize requisites
Support different versions
Do not log in production
Do not crash silently and fail fast
Degrade gracefully in an event of error
Catch specific exceptions
Handle poor network conditions
Reluctance to include large libraries as dependencies
Do not require dependencies unless you very much have to
Try not to hog the startup
Remove features and functionalities gracefully
Make your code testable
Document everything
Provide a most minimalistic sample app
Consider putting up a license
Get feedback, lots of them
As a rule of thumb follow the rule of SPOIL-ing your Library
Simple — Briefly and Clearly expressed
Purposeful — Having or showing resolve
OpenSource — Universal Access, Free license
Idiomatic — Natural to the native environment
Logical — Clear, Sound Reasoning
I read this sometime back in a presentation by some author I cannot recall. I took note of it as it makes a lot of sense and provides a clear picture in a very concise manner. If you know who the author is, please comment it and I will add his link and give due credit.
Ending Thoughts
I hope this post helps fellow android devs in building better android libraries. Android Community benefits extensively from using android libraries published daily by fellow android devs and if everyone starts to take care of their API design process keeping in mind the end user (other android developers) we would all be a step closer to an even better ecosystem as a whole.
These guidelines are compiled on my experience of developing android libraries. I would love to know your views on the pointers mentioned above. Please leave a comment, and let me know!
If you have suggestions or maybe would like me to add something to the content here, please let me know.
This is a simple set of tips and tricks regarding Android Development which I have gathered from various sources. It helps me direct other android devs in my community regarding stuff each android dev should know about. Its also there for me to keep track of anything I either learn on my own or from other sources now and then when browsing the internet.
Contributions are always welcome, hoping people will help me in growing this. To contribute, simply open up a PR with the changes.
The plugin basically will annoy the hell out of you by showing you a big screen overlay with the key combination you should have used , if you used your mouse to execute some command to a level when you basically would start using the key combination just to avoid KeyPromoter annoying you all the time. Its also is useful features, like it will prompt you to create a key binding for a command which does not have a key binding and you have used it 3 times.
This one needs special mention due to how useful it is. It basically is a window to your device i.e it streams and allows you to interact with your physical device on your laptop. Very useful when you are demo-ing your app during a presentation. You can interact with your physical device and it will be shown right in your laptop screen. It has a paid/free version , paid version is totally worth buying.
Yes, vysor was great, but if you want to share your keyboard and mouse directly to your Android device, then this app is for you. It enables you to control your Android device as if it was part of your desktop computer. The FREE version includes use of computer mouse, while the PRO version includes features such as use of keyboard. This is useful where you can test your app without your hands ever leaving your keyboard.
Its a standalone tool for Android Devs used to browse any Android executable and show important info such as class interfaces and members, dex counts and dependencies
With the speed android dependencies update, sooner or later you are going to encounter some sort of dependency conflict. Solution is making use of Dependency Resoultion. Official Reference
Make your builds faster by building offline[Ref Link]
The --offline flag tells gradle to always use dependency modules from the cache, regardless if they are due to be checked again. When running offline, gradle will never attempt to access the network to perform dependency resolution. If required modules are not present in the dependency cache, build execution will fail.
Reduce installed app size with "android:extractNativeLibs:false" in <application>[Ref Link]
This will essentially prevent the system from creating a second copy of the .so files and fix the System.loadLibrary call so it’s able to find and open native libs straight from the APK, no code changes on your part required.
Selectivily execute a specific method in Android Studio[Ref Link]
Did you get one of these Google Play Developer Policy Violation Emails? Worry not, generate a Privacy Policy for your android app[Ref ink]
Tips regarding UI/UX
Motion
Material Design uses real-world metaphors as its foundation. Objects in the real world don’t move linearly, they move in curved paths and accelerate and decelerate according to the motion’s properties.
As such, motion should also use such properties and animate objects so that the motion feels natural rather than forced
For example, a car leaving the screen in a movie starts off slowly, then accelerates till it’s out of the frame. Similarly, views should be interpolated using classes like AccelerateInterpolator, FastOutSlowInInterpolator, etc. [[More Info]](https://developer.android.com/reference/android/animation/TimeInterpolator.html
Typography
While custom typefaces can be used for branding, it is essential to stick to Roboto and Noto if possible, especially for body text, due to their clarity and optimistic nature.
Roboto covers Latin, Greek and Cyrillic extended scripts, with Noto filling in for other language scripts [More Info]
Weight balancing is an important aspect of typography, the fundamental concept of which is that the larger a typeface is, the less its weight should be so that it doesn’t appear too thick and balances its weight with smaller typefaces of higher weights
Typography should align to a 4dp baseline grid, and maintain a minimum contrast ratio of 4.5:1 based on luminance values, with a recomemended ratio being 7:1.
The ideal reading length for large blocks of text is 40 to 60 characters per line. Anything less is too narrow and anything more is too wide.
Icons
Icons should be designed at 48dp, with 1dp edges, which equates to
48px by 48px at mdpi
72px by 72px at hdpi
96px by 96px at xhdpi
144px by 144px at xxhdpi
192px by 192px at xxxhdpi
An additional icon of 512px by 512px should be designed for use on Google Play
Material icons, in addition to the base icon, should contain the following important elements
1dp tinted edge at the top
1dp shaded edge at the bottom
Contact shadow – a soft shadow around all edges of raised elements
Finish – a soft tint to provide surface lighting, fading from upper life to lower right [More Info]
Ripples
When implementing Ripple Effect use ?attr/selectableItemBackground instead of ?android:attr (Ref)
When implementing Ripples contained within the view like Button, use (Ref)
When implementing Ripples that extend beyond the view’s bounds like ImageView: (Ref)
?attr/selectableItemBackgroundBorderless
Other Points to Note
Views should be aligned to Material Design’s 8dp baseline grid and the keylines when possible. This gives the UI a sense of structure and hierarchy. [More Info]
If you plan on keeping a reference to any ViewGroup (LinearLayout, FrameLayout, RelativeLayout, etc.), and you don’t want to use any methods specific to this particular type of Layout, keep it as a ViewGroup object. [More Info]
While picking an accent color (if the brand already has one), pick a color complementary to the primary color so that the contrast is high enough
Mockey – A tool for testing application interactions over http, with a focus on testing web services, specifically web applications that consume XML, JSON, and HTML.
JSON Placeholder – Fake Online REST API for Testing and Prototyping
Material Palette – Easily generate the color pallete based on material design
Javadoc Themer – Give your boooring javadocs a splash of colors!
Method Count – Use this tool to avoid the dreaded 65K method limit of the DEX file format!
Gradle, please – Lookup dependency reference name to include as your gradle dependencies
jsonschema2pojo – Generate Plain Old Java Objects from JSON or JSON-Schema
Android Asset Studio – A web-based set of tools for generating graphics and other assets that would eventually be in an Android application’s res/ directory.
RecyclerViewHelper – RecyclerViewHelper provides the most common functions around recycler view like Swipe to dismiss, Drag and Drop, Divider in the ui, events for when item selected and when not selected, on-click listener for items.
QREader – A library that uses google’s mobile vision api and simplify the QR code reading process
ScreenShott – Simple library to take a screenshot of the device screen , programmatically!
EvTrack – Android library to make event and exception tracking easy
OptimusHTTP – Android library that simplifys networking in android via an async http client
ShoutOut – Android library for logging information in android
Credits
This curated cheatsheet includes tips and tricks that I have been following in my workflow as well as those being suggested/followed by other android devs worldwide.I have tried to add direct links wherever I could remember, giving people due credit who have explained the concepts. If you think I have missed any , then either send a PR or open an issue and I will fix it asap.
If you found this cheatsheet helpful or you learned something today and want to thank me, consider buying me a cup of
If you are looking for a technical training kind of an article, you have come to the wrong place then :). I am writing this to share a few “things” about Android that I have experienced / heard, so that we can all have some fun time while our gradle builds are running or while we are sipping a cup of tea or maybe in the middle of a boring meeting.
WARNING!
Kindly read at your own risk. Don’t miss the Damage-control links!
Let’s begin! Shall we?
Afor Activity. Activity in android is one of the main components. Almost every application contains at least one Activity.
“Best way to prevent your Activity from getting restarted on orientation change is to set android`:configChanges` and just forgetting about it.”
Bfor Broadcast. Android is a chatty place, it’s components like to talk to one another and they can do so via broadcasts.
“Broadcast Receiver’s onReceive() is your stage. Go wild here and perform all the long running tasks.”
Cfor ContentProvider. ContentProvider provides us with an abstract layer and a way to share data among different applications.
“Creating a ContentProvider for your application is a MUSTfor you. You don’t seem to have a life anyway.”
Dfor Doze Mode. Android Devices can explode if they don’t doze off for a while. Android also takes a nap when you don’t play with it.
“No-body cares about your Alarms, your Wake-locks, your sync jobs or even your app. Why should you?”
Efor Elevation. It is to show that a certain sheet of paper lies above the other paper. For instance, FABs lie above your screen and are elevated.
“Best way to have elevation in your apps is to just use setElevation() function and a get a super-ugly flat UI on pre-lollipop devices. Deal With It!”
Ffor Firebase. Firebase provides us with tools to create great apps. In 2016, the company was acquired by Google and that’s why I/O 2016 was filled by almost all Firebase stuff.
“Start by Realtime Database to cache all your data. Upgrade to FCM or your phone might not wake up once it dozes off. Firebase all the things!”
Gfor Gradle. Used to automate and manage the build process and produce your apk and aar‘s for you. Intention is to make your build process smooth.
“I love Gradle! It makes our life full of power-naps and TT.”
Hfor Handler. Handler is tied to a thread and is used to handle messages. It can be instantiated using the main Looper instance Looper.getMainLooper(). It is usually used to execute certain tasks on UI thread via messages coming from a background thread.
Animation not running? Keyboard not showing up? width/ height is 0? Do the magical handler.postDelayed() and you are good! Yeah go ahead and pat your back.
Ifor Intent. Intent is the intention to perform a certain action. It can be Explicit (Direct — Authoritatively announce to perform an action like an extrovert) or Implicit (Indirect — First give a signal regarding your intention and perform an action when invited like an introvert).
Jfor Java. It’s an awesome programming language which is meant to WORA — Write Once, Run Anywhere . Java was developed by James Gosling of Sun Microsystems (acquired by Oracle). Android applications can be written using Java.
“Damn! WORA — Write Once Regret Always”
Kfor Kotlin. Kotlin is a statically typed, JVM based programming language. It is highly interoperable with JAVA and is a very attractive alternate to Java Developers who are sick of it’s verbosity (not me, I have an IDE).
“I once wrote an Application in Kotlin. Code | Convert Java File to Kotlin File.”
I would have definitely given it a try if it was named Korean though.
L-> {Lambda Expressions}. Less formal and more readable expressions.
“I like verbose.”
Mfor MVP. It stands for Model-View-Presenter. It is an architectural pattern to separate the logic from the presentation layer. More and more people are adopting this pattern for Android Development these days.
“Let’s make our lives a living hell and drown in the ocean of unlimited classes and interfaces.”
Ofor OkJesse. Jesse Wilson, developer at Square told in one of the Fragmented Podcasts about the reason behind naming the libraries as OkHttp, OkIO. It’s because OK is a moment to rejoice for all of us :
“We, Developers live to get a 200 OK from the API. Always”
Pfor PendingIntent. It is an Intent that you give to another application to run. Pending Intent runs with our permissions in somebody else’s environment. Example: Alarms.
“Lazy to complete a task? Pass it to another application as a pending intent instead.”
Qfor Query. Your app has a database. You want to fetch some records. Guess what you need for that? No! you need to have some data in the database first and then you can query!
Select * from PJs WHERE name like ‘Q%’ ;
0 results found.
Rfor Rxify. Rxify is the term given by me to the use of Reactive programming and it’s operators. I believe that reactive programming can achieve difficult and error-prone tasks easily at the flick of a wrist.
“I love MAGIC! But with great POWER comes MissingBackpressureException”
Sfor Service. Service is one of the main components of Android. They do not have a UI of their own and are supposed to perform some tasks which do not involve much user interaction.
“Service runs in background, Go Ahead and do all your ugly stuff here and die in the hands of ANR.”
Tfor TDD. TDD stands for Test Driven Development. It’s the practice which says that we should first write all the test cases for anything we develop which all initially fail. We should then code to make them all pass.
“Let’s aim for 100% test coverage and make the client pay for it.”
Ufor URI. URI stands for Uniform Resource Identifier. It is like an address which points to some “thing” of significance.
“Even after ~ 4 years of Android Development I do not fully understand the concept of URI myself. You can safely skip this section.”
Vfor View. Basic component of any User Interface in Android. On the screen it takes up a rectangular area.
“Custom Views are so cool, let’s always draw our views ourselves.”
Wfor Wharton, Jake Wharton. He is the GeekGod of Android who works at Square. He has given us “things” like ButterKnife, Dagger, Retrofit, Timber, Hugo etc.
“Applications respond to Chuck Wharton even in the case of ANR.”
Xfor xml. Extensible Markup Language is designed to be both machine and human (haha.. ya right!) readable. Using xml we can define a set of rules.
“Let’s use the cool new ConstraintLayout. It can be created using the Layout Editor, no need to work with stupid xmls anymore. … 4 hours later…. *creates a LinearLayout using xml*.”
Yfor Yoda, you are. After you have mastered at least the things mentioned above, you can safely call yourself a pro.
“After this rigorous training you have become the Master of Android Things.”
Zfor zzz. All work and no “Zzz” makes droid a dull “thing”.
“While you were reading this article, your device probably dozed off and your dear app won’t be able to do any damn thing about it!”
TL;DR
You missed all the good stuff. No issues, go back to stare at your “Gradle Build Running” dialog then 😛
This post was partially inspired by @anddev_badvice on Twitter and title from “How to Train your Dragon” movie which is pretty awesome!
I am myself a droid who is still learning. If you think I made a mistake anywhere, or you seek an explanation to the silly stuff in this post, leave a response. Click the heart if you want your fellow droids to chill a little too.
This is your very first post. Click the Edit link to modify or delete it, or start a new post. If you like, use this post to tell readers why you started this blog and what you plan to do with it.